Thursday, March 10, 2011

MicroAdobe PDF Editor v5.4

MicroAdobe PDF Editor v5.4


MicroAdobe PDF Editor is a professional software for editing PDF. You can new and edit PDF file just like operating Mircosoft Office Word. It also can be used for editing table, plug-in image and making hyperlink. Moreover, it supports BookMark and page browser and allows you to import word(.doc), Html, Rtf file.

Features:
  • You can import Office Word( DOC), RTF, TXT, HTML, XML.
  • You can Export Office Word(DOC), TXT, HTML
  • You can save pdf file
  • Add Text, Headers or Footers
  • Insert Table, Image, File
  • Search and Replace
  • BookMark and Page Browse
[4MB]: download now

Download complete websites to your desktop and surf them offline.

Download complete websites to your desktop and surf them offline.


Website eXtractor saves you time and effort by downloading entire Internet sites (or the sections you stipulate) to your hard drive.

Whether you browse the web for research, work, or fun, there's nothing worse than having to wait for page after page to load in Internet Explorer or Netscape Navigator (or in other popular browsers). The problem is they will only load one page at a time. So if you are viewing a large website with a thousand pages, you'd have to click the mouse a thousand times ... and ... choose a directory/folder a thousands times when you want to save each file. You end up spending a lot of time waiting around and not enough time reading or viewing pages on the Internet.
Note: Using a regular browser to surf large websites or photo galleries takes the fun out of web browsing and makes research a real chore.
But now, with WebSite eXtractor, you can download whole websites (or parts of them) in one go to your computer. You can then view the whole site offline at your leisure - and you can whiz through the saved pages at lightning speed.
WebSite eXtractor is a great tool for researchers, journalists, students, equity analysts, business and marketing executives - as well as for those who want to browse family websites containing digital photo albums.

Advantages :
  • Transfer whole websites to CD-ROM or floppy
  • Another big benefit of the program is it changes html-links to relative names. In other words, it turns web addresses (URLs) into addresses that work on your computer.
  • Researchers, writers, and journalists can easily archive reference material from the Internet.
  • The program can download up to 100 files at a time, which saves you a huge amount of time compared to ordinary browsers.
  • Website eXtractor automatically lets you download any files that were not copied due to transfer errors or bad connections.

To download the full version use the given torrent :http://torrents.thepiratebay.org/3655896/Website_eXtractor_9.52_Retail.3655896.TPB.torrent

If you dont have torrent client download from here :http://www.internet-soft.com/DEMO/webextrasetup.exe

USB Disk Security 5.1.0.15 Portable

USB Disk Security 5.1.0.15 Portable

Compare USB Disk Security against other antivirus solutions, you will find out its highlights: USB Disk Security provides 100% protection against any threats via USB drive, however, the majority of other products are unable even to guarantee 90% protection.

USB Disk Security is the best antivirus software to permanently protect offline computer without the need for signature updates, but other antivirus software should update signature database regularly, and they cannot effectively protect offline computer. This light and easy to use solution is 100% compatible with all software and doesn't slow down your computer at all. You pay USB Disk Security once and get it all, however, other antivirus products should be paid for updates every year.
    • 100% protection against any threats via USB drive
    • The best solution to protect offline computer
    • The world's fastest and smallest antivirus software
    • Require no signature updates
    • 100% compatible with all software
    • Easy to use
Operating Systems: Windows Vista, Windows 95, Windows Me, Windows XP, Windows 2000, Windows NT, Windows 98.
System Requirement: 100MHz Processor or more, 16MB RAM or more

Remove Autorun Virus Infection - Solution for USB, PC & Laptops.

Remove Autorun Virus Infection - Solution for USB, PC & Laptops.

Nowadays, there is a new problem that is cropping up in almost all schools,colleges, hostels etc. where the malicious Autorun Virus is Creating Havoc by spreading to Laptops and PC through USB Drives etc.

How to Stop the Autorun PC Virus Infection ?

The free Panda USB Vaccine allows users to vaccinate their PCs in order to disable Autorun completely so that no program from any USB/CD/DVD drive (regardless of whether they have been previously vaccinated or not) can auto-execute. This is a really helpful feature as there is no user friendly and easy way of completely disabling Autorun on a Windows PC.


Panda USB Vaccine is a 100% free utility. Its tested under Windows 2000 SP4, Windows XP SP1-SP3, and Windows Vista SP0 and SP1.
Download : Click Here to get Panda USB Vaccine

Stop Autoplay In USB Flash Drives By Pressing One Keyboard Button

Most of the virus enters the computer through USB Flash drives, when we open the drive through autoplay the viru is a simple tip with which you can stop autoplay in USB Flash drives. Not only flash drives, it also stops autoplay for CD and DVD also.
While inserting CD, DVD or any flash drive, simply press and hold the Shift key, this will disable the autoplay dialog box. Holding down the Shift key will also block the applications that starts automatically.
Works fine in Windows XP and Windows Vista, Just give it a try and drop your comments.

Reimage Repair Review - Read About Reimage and The PC Performance Analysis

Reimage Repair Review - Read About Reimage and The PC Performance Analysis

My computer has been acting kind of sluggish and congested, my windows would take forever to open and it was almost impossible to browse websites or play any games – things would just take too long! So I figured maybe I had a virus or some malware on my computer affecting performance. I did a search for a free PC performance analyzer, one that would also scan my computer for malware. I came across Reimage through a recommendation in a forum and it did just that.
You download the program and after it’s done compiling information on your PC (like which operating system you’re using), the preliminary scan begins.
Reimage first scans your computer thoroughly; all the files, folders, registry keys and values, drivers, DLL files, everything related to PC performance, etc. The free scan is done in only 5 minutes then you get your free PC scan summary.
Reimage will scan your PC for:
PC Stability –Compiles a graph depicting which programs on your PC crash the most often.
PC Security - Scans for malware threats and uses 3 different ways of checking if your files are indeed a threat to your PC’s security. It then lists all the malicious files it’s found. These files are “tagged” for repair during the repair step.
In my case, Reimage found 5 malicious files on my PC. It also told me about one program that may crash.
PC Hardware - You get a hardware profile of your PC’s parts. It then compares your PC’s hardware (memory, disk space, CPU temperature) to a worldwide average.
In my case, I didn’t have enough memory on my PC (I guess I’ll just have to delete some programs I’m not using.)
I went ahead and purchased a license key to start the repair.
The Reimage repair started by clearing all the faulty files they found on my PC during the scan.
Then it was on to repairing damaged files and installing the fresh files from Reimage’s up to date online database. These files are downloaded straight from their servers (based on my geo-location) and are chosen based on my exact Windows operating system.
After the new replacement files were downloaded to my PC, the stability check took the longest to complete. The stability check makes sure that all performance issues are resolved on your PC. This is done by comparing your now fixed PC to the original stability report.
I was prompted to reboot a few times and then it was done. My computer’s performance has improved; I think cleaning out all those junk files, viruses and repairing damaged files gave my PC a real boost.

Oops for Beginners

Oops for Beginners

Introduction
 Object-oriented programming (OOP) is a programming paradigm that uses "objects" and their interactions to design applications and computer programs. Programming techniques may include features such as abstraction, encapsulation, inheritence, and polymorphism. In this article I will try to descibe each one of them.

In order to understand this article, you should know basics concepts of an object, class. Lets see what are they.

Object

Basically an object is anything that is identifiable as an single material item. You can see around and find many objects like Camera, Monitor, Laptop etc. In OOP perspective, an object is nothing but an instance of a class that contains real values instead of variables

Class

A class is a template definition of the methods and variables for a particular kind of object. In other words, class is the blue print from which an individual objects are created.

Now lets see basic features of Object Oriented Programming one by one.

Abstraction
Abstraction is a process of identifying the relevant qualities and behvaiors an object should possess. Lets take an example to understand abstraction. A Laptop consists of many things such as processor, motherboard, RAM, keyboard, LCD screen, wireless antena, web camera, usb ports, battery, speakers etc. To use it, you don't need to know how internally LCD screens, keyboard, web camera, battery, wireless antena, speakers works. You just need to know how to operate the laptop by switching it on. The intrinsic details are invisitble. Think about if you would have to call to the engineer who knows all internal details of the laptop before operating it. This would have highly expensive as well as not easy to use everywhere by everyone. So here the Laptop is an object that is designed to hide its complexity.

Think If you need to write a piece of software to track the students details of a school, you may probably need to create Students objects. People comes in all different backgrounds, educational qualifications, locations, hobbies, ages and have multiple religion, language but in terms of application, an student is just a name, age, class and roll number, while the other qualities are not relevant to the application. Determining what other qualities (background, qualifications, location, hobbiels etc) are in terms of this application is abstraction.

In object-oriented software, complexity is managed by using abstraction. Abstraction is a process that involves identifying the critical behavior of an object and eliminating irrelevant and complex detilals. A well thought-out abstraction is usually simple, and easy to use in the perspective of the user, the person who is using your object.


Encapsulation
Encapsulation is a method for protecting data from unwanted access or alteration by packaging it in an object where it is only accessible through the object's interface. Encapsulation are often referred to as information hiding. But both are different. Infact information hiding is actually the result of Encapsulation. Encapsulation makes it possible to separate an object's implementation from its orgiinal behavior - to restrict access of its internal data. This restriction facilitate certains detiails of an object;s behavior to be hidden. This allows to protect an object's interal state from corruption by its user.

It is the mechanism by which Abstraction is implemented. In other words you can say that it is the result of the Encapsulation. For example, the Laptop is an object that encapsulates many technologies/hardwares that might not be understood clearly by most people who use it.

Inheritence
Inheritecne is the ability to define a new class or object that inherits the behavior and its functionality of an existing class. The new class or obejct is called a child or subclass or derived class whie the original class is called parent or base class. For example, in a software company Software Engineers, Sr. Software Engineers, Module Lead, Technical Lead, Project Lead, Project Manger, Program Manger, Directors all are the employees of the the compnay but their work, perks, roles, responsiblitues differs. So in OOP, the Employee base class would provide the common behaviours of all types/level of of employee and also some behaviors properties that all employee must have for that company. The particular sub class or child class of the employee would impelement behaviors specific to that level of the employee. So by above example you can notice that the main concept behind inhertience are extensibility and code reuse (in this case you are extending the Employee class and using its code into sub class or derived class).

Polymorphism
As name suggests, Polymorphism means an ability to assume different forms at different places. In OOP, it is a language's ability to handle objects differently based on their runtime type and use. Polymorphism is briefly described as "one interface, many implementations".Ppolymorphism is a characteristic of being able to assign a different meaning or usage to something in different contexts - specifically, to allow an entity such as a variable, a function, or an object to have more than one form.

There are two types of polymorphism.

Compile time polymorphism - It is achieved by overloading functions and operators
Run time polymorphism - It is achieved by overriding virtual functions
Lets say you have a class that have many Load methods having different parameters, this is called Compile time polymorphism.
Run time polymorphism
Lets take another example where you have a virtual method in the base class called Load with one parameter and you have redefined its functioanlity in your sub class by overriding base class Load method, this is called Run time polymorphism.

In this small article, I have tried to explain basic features of OOPS in little details. OOPS in itself is a very vast subject and explaining each and every features is near to impossible for me. If you have any comments of suggestions, please respond to this article.

Friday, March 4, 2011

Change the Default Playback Sound Device in Windows 7

As computer components become increasingly complex and integrated with other components, it is likely that any modern computer contains more than one sound device. In fact, there is no reason why you can’t have multiple sound cards in the same computer. Learn how to change the default playback sound device on a Windows 7 PC.

Multiple Sound Devices in Windows 7

Video cards, sound cards, motherboards, and even speakers with built in audio processing capabilities can all show up in Windows 7 as an audio device. To make things easier, Windows 7 assigns just one of these devices default playback status through which all sound from the computer is processed and pushed out to speakers, headphones, or some other output device.
Occasionally, Windows 7 has a problem loading the drivers or recognizing the default sound device in your PC. When this happens, the operating system designates another device as the default playback device.
Once you fix the problem, you must reassign default playback status to the original device. This article shows you how to access the audio devices in Windows 7, discover which device is the default one, and reassign default playback status to the audio device of your choosing.

Changing the Default Audio Device in Windows 7

To change the default sound device in your PC, you must first access the list of audio devices installed in your computer. Click on Start>Control Panel>Hardware and Sound>Sound.
Windows 7 Playback Devices
You should now be looking at the Sound window. Note that this window has four tabs: Playback, Recording, Sounds, and Communications. You should be looking at the Playback tab but if not, click on it now.
The Playback Tab on the Sound Window in Windows 7
The devices listed in the Sound window depend on the physical and logical audio hardware and software you have installed on your PC. Note that this particular user has three devices: Speakers on the SB X-Fi Xtreme Audio, Digital Audio Interface on the SB X-Fi Xtreme Audio, and Speakers on the Z Cinema TruSurround HD. Notice that the green checkmark indicates that the Z Cinema device is the default device.
Change the Default Playback Sound Device in Windows 7
Suppose that we want to change the default device to the Speakers on the SB X-Fi Xtreme Audio device. Simply click on that device and then click on the button labeled Set Default. If the device is working properly in Windows 7, the green checkmark will move to that device and now all sound will be piped through that device.
Set the Sound Blasted as the Default Playback Audio Device in Windows 7
When done, click the OK button and test that the sound is working properly through the device you just selected.
Windows 7 makes it easy to change the default playback sound device. However, the number of potential playback devices that appear on your computer depends on the hardware and software you have installed in your PC. Unlike previous versions of Windows, it is usually unnecessary to restart your computer to change the default audio device.

Increase the Memory to an XP Mode Virtual PC in Windows 7 Professional

If you opted for the Professional version of Windows 7, you have instant access to XP Mode using the Windows Virtual PC application. It comes with a fully licensed version of Windows XP offering you the ultimate in backward application compatibility.
However, some applications in XP Mode need more memory to run than others. Learn how to increase the memory to an XP Mode Virtual PC in Windows 7

XP Mode Memory in a Virtual PC

When you run XP Mode in Windows 7 Professional, you are really running the Windows Virtual PC application that loads a fully licensed version of Windows XP. Just like a real computer, Virtual PC needs to have access to a processor, a video card, and memory to run the operating system.
The Virtual PC in XP Mode uses some of your computer’s physical memory to run. When you created the virtual computer, 512MB of memory were allocated to XP Mode by default. However, if you have free RAM in your computer, you can allocate more memory to Windows Virtual PC during XP Mode to make applications run faster and more efficiently.
Keep in mind however, that the more memory you allocate to XP Mode, the less your real computer has to use. Of course, this only occurs when you are running the Virtual PC. Generally, you should allocate about 1GB of memory to XP Mode to avoid slowdowns and error messages associated with running out of memory while you run your older applications.

Increasing Memory to a Virtual PC for XP Mode

Click on Start>All Programs>Windows Virtual PC>Windows Virtual PC.
Open Windows Virtual PC
In the Virtual Machines window, right click on your XP Mode Virtual PC and select Settings from the menu.
Windows XP Mode Settings
You should now be looking at the Windows XP Mode – Windows Virtual PC Settings window. Click on the Setting labeled Memory and note how much memory is currently allocated to your XP Mode Virtual PC. If you are like most people, the value should be 512MB.
Memory Allocation in XP Mode
Look on the right hand side of the window and notice the value next to Memory (RAM). It should be the same value that you noted above. Now note the value next to the label Available Memory. This is the maximum amount of memory you can allocate to your XP Mode Virtual PC because it is the amount of free memory you have in your computer.
Increase the Memory Available to Windows Virtual PC XP Mode
In the Memory (RAM) box, type in a new number that represents the amount of your computer’s memory you want allocated to the Virtual PC during XP Mode. A good amount to increase it to is 1GB. To increase the memory to 1GB, type 1024 in the box (1024MB = 1GB). When done, click the OK button.
Using your computer’s free memory, you can increase the amount of memory allocated to Windows Virtual PC in XP Mode to just about any value you want. You just can’t allocate more than the amount of free memory you have in your computer.
Many users find that the default value of 512MB isn’t quite enough and opt to increase it to 1GB. Since the memory in Virtual PC is measured in MB, you should use the value 1024 to allocate 1GB of memory to XP Mode.

Run Old Programs in 64-bit Windows 7 with Compatibility Mode Options

The switch from 32-bit versions of Windows to 64-bit versions has been a slow transition. Although Windows XP, Vista, and 7 all have 64-bit versions available, many people still opt for the 32-bit versions. The biggest reason for this is compatibility issues with older programs, hardware, and drivers.
Microsoft recognizes that wanting to use older programs is a barrier for people who may be considering moving to a 64-bit version of Windows. In anticipation of this barrier, the software giant built into Windows 7 the ability to select a variety of compatibility options to ensure that older programs have a good chance to work under the new 64-bit operating system.

Making Compatibility Changes for a Program

Before you begin using compatibility options in Windows 7, you should know a few things. First, there is no guarantee that selecting compatibility options will make all of your old software work. These options are simply an attempt to simulate the operating environment of older versions of Windows.
Second, you can make compatibility changes to either programs themselves or shortcuts to programs. Either way, you will need to undo these changes if you want to revert back to normal operating mode. If you make compatibility changes to a program shortcut and then delete that shortcut, you will have to locate either another shortcut to the program or the program’s exe file to undo or make further compatibility changes. If this sounds complicated, don’t worry it’s not. Choosing compatibility options for a program is as simple as selecting and deselecting options from a list.

Changing Compatibility Options

Let’s say you have an old program installed on a 64-bit Windows 7 PC and you are having trouble running it. The problem may be a compatibility issue. Although Microsoft has done a good job of maintaining compatibility when a user runs a 32-bit application on a 64-bit platform, not every contingency can be anticipated or resolved.
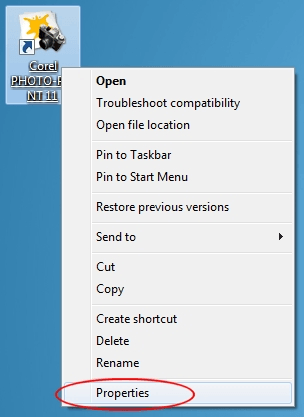
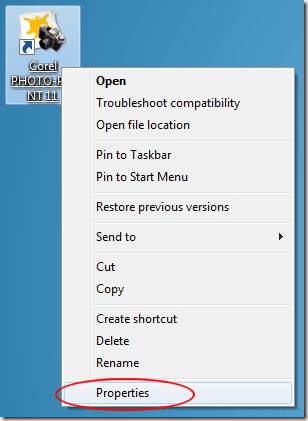
To begin using compatibility mode options in 64-bit Windows 7, right click on the program or shortcut to the program that is not running properly and choose Properties from the menu.
Right Click and Choose Properties
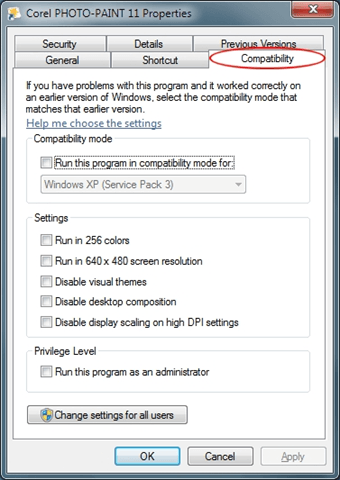
You should now be looking at the properties for the program. Click on the Compatibility tab and notice that you have a number of options available. Each of the options falls into one of three categories: Compatibility Mode, Settings, or Privilege Level.
Windows 7 Compatibility Options
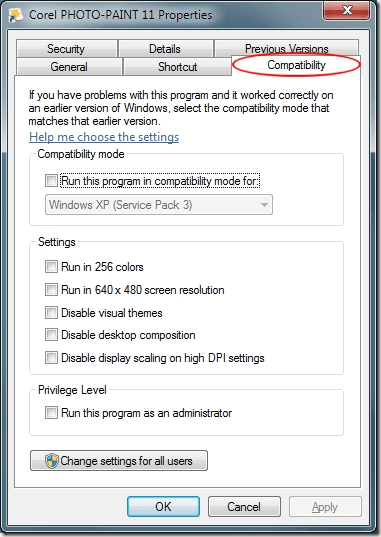
Below is a description of each of these options.
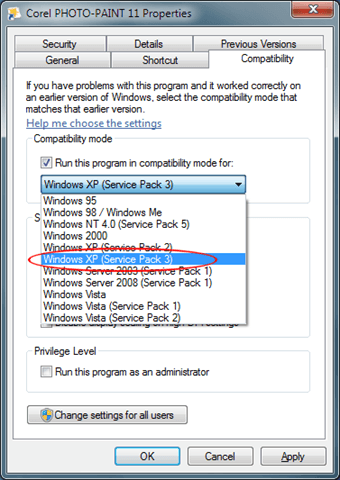
Compatibility Mode

This option is a great choice when you know exactly under which version of Windows your program runs well. For example, if your program was released at the time when Windows XP was the reigning version of Windows, clicking the option box titled Run This Program in Compatibility Mode and choosing Windows XP from the drop down list is good choice.
Choose Windows XP Compatibility Mode
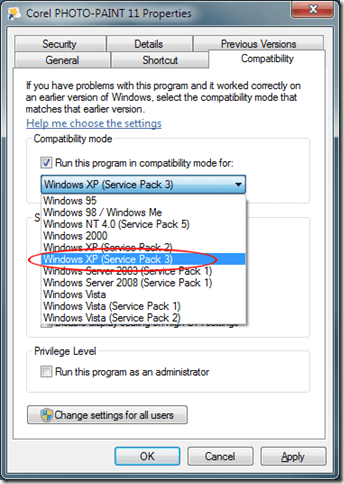
Notice that compatibility mode offers up to eleven choices ranging from Windows 95 up to Windows Vista. Also notice that you can even choose to run your program in compatibility mode using the settings for various service packs for these operating systems.

Settings

This section of compatibility options lets you fine tune your compatibility experience for your old program. Generally, these options are for programs that were written for and run on very old versions of Windows such as 95, 98, and ME.
For example, the native resolution and color depth of Windows 95 was only 640×480 at 256 colors. If your old program is running but looks too small or has strange colors, try these two options.
If Windows 7 warns you that the program is incompatible because of some video issue, consider trying the compatibility settings labeled Disable Visual Themes and Disable Desktop Composition. These settings often interfere with outdated video rendering in old programs.
Finally, if your program was written for a 4:3 ratio screen, consider trying the option titled Disable Display Scaling on High DPI Settings. This one will not scale the program to fit the current resolution and aspect ratio of your monitor.

Privilege Level

The last option on this window has to do with how Windows currently assigns permissions in Windows 7 and how it used to assign permissions in previous versions of the operating system. Windows 95, 98, and ME did not take advantage of multiple user accounts; everyone used the same desktop, had the same permissions, and had complete control over every aspect of the operating system. Essentially, everyone was a top-level administrator.
This is a problem for programs released under those conditions because they enjoyed nearly unbridled access to hardware, software, and drivers. Checking this option will ensure that the program has the permissions it needs to run as if it had this kind of control again.
It seems everyone has some old program that they wish would work under Windows 7. If you are running the 64-bit of Windows 7, you are even less likely to get that program running than if you use the 32-bit version.
However, by taking advantage of compatibility mode options you may be able to use your old software again and avoid having to consider other options such as dual booting your PC with an older version of Windows or running a virtual PC from within Windows 7.

Change How an XP Mode Virtual Machine Closes in Windows 7 Professional

A feature found in Windows 7 Professional, XP Mode is a special type of Virtual Machine that allows backward compatibility with software that is only compatible with Windows XP and previous versions of the operating system. By default, Windows Mode Virtual Machines are set to hibernate when closed. However, you can change how XP Mode closes to include shut down or turn off.

XP Mode Closing Options

XP Mode uses Microsoft’s Virtual Machine technology to allow you to run a fully licensed copy of Windows XP right from within Windows 7. For some, this is the only option available when upgrading to Windows 7 and needing a way to use some software compatible only with Windows XP and previous versions of the operating system.
By default, XP Mode puts the Virtual Machine into Hibernation when it closes. For most people this is not a problem. For others, hibernation never works quite right and corrupts the previous XP Mode session. The result is lost data and time. Luckily, you can force XP Mode to either Shut Down or Turn Off the Virtual Machine when you are done using it.

Change How XP Mode Closes

In Windows 7, click on Start>All Programs>Windows Virtual PC>Windows Virtual PC to open the Virtual Machines window. Right click on the Windows XP Mode Virtual Machine. It is possible that your XP Mode Virtual Machine has a different name. Whatever the name, right click on it and choose Settings from the menu.
Open XP Mode Virtual Machine Settings
You should now be looking at the Windows XP Mode – Windows Virtual PC Settings window. In the left hand pane, locate and click on the setting labeled Close and note that the Current Value is set to the default value Hibernate.
XP Mode Virtual Machine Default Hiberate Close
In the right hand pane, you have two major options. The first is labeled Automatically Close with the Following Action. That option is chosen with the sub-option Hibernate selected. The second major option is Prompt for Action. If you choose this option, you will have the option of Hibernate, Shut Down, or Turn Off each time you close XP Mode.
With the Automatically Close with the Following Action option selected, click the sub-option drop down menu and note that you can have XP Mode automatically close with Hibernate, Shut Down, or Turn Off. Below is a description of each option and some hints on which one is best for you.
Change How XP Mode Closes
Hibernate – The default option, the Virtual Machine does not actually shut down when you close XP Mode. Instead, it writes whatever is in memory to disk, saves the condition of all open windows, applications, processes, services, etc., and closes the Virtual Machine. This is the best mode if you want to save the state of your XP Mode session and make XP Mode startup as quickly as possible the next time you use it.
Since the state of your session is captured, it can pose a security risk if you leave sensitive information in your Virtual Machine’s memory. In addition, hibernation is not known for its stability as a close option. Sometimes the hibernation hangs on closing or opening forcing you to do a cold start anyway.
Shut Down – This option behaves just like when you shut down Windows 7. XP Mode shuts down the virtual machine just as if the operating system were running on a physical computer. No volatile memory information is saved and the operating system warns you if you have applications still running when you try to close XP Mode.
This is the safest close option; it ensures that the XP Mode Virtual Machine will not hang on the next startup. However, startup and shutdown times are definitely longer than when using a Hibernation close.
Turn Off – This is a strange option to have available as an automatic close option because it is the equivalent to either pushing the power button on your PC or pulling the power cord from the back of your computer.
Remember that we are talking about the XP Mode Virtual Machine here and not Windows 7 on your physical PC. Still, the potential for data loss and system file corruption is very real. Never choose this option as an automatic close action for XP Mode or any other Virtual Machine.
Like any Virtual Machine, you can change how XP Mode closes by choosing a hibernation, shut down, or turn off action. While Shut Down is the safest choice, it also adds time to all XP Mode startups and closings. Hibernation is a good choice if it works for you and you don’t mind the added security risks to sensitive data left in the save state of hibernation. Turn Off is never an option to select; it is equivalent to pulling the plug from your PC. The result can be data loss and instability the next time you startup XP Mode.

Setup Surround Sound in Windows 7

Buying speakers and a good sound card is the first step to getting surround sound from your Windows 7 PC. However, even after you place your speakers and install the drivers, you still need to setup your surround sound system. Learn how to setup a surround sound system in Windows 7.

Surround Sound and Windows 7

It takes some specific hardware and software to achieve surround sound from a Windows 7 PC. First, you must invest in either 5.1 or 7.1 speakers. With 5.1 surround sound, you get the following speaker configuration:

Change the Windows 7 Cursor to Look Like the Mac OS Cursor

Long ago, when Microsoft made its first graphical user interface (GUI) to replace DOS, one place they looked toward for inspiration was Apple’s GUI. Many of Apple’s design choices were mimicked, and then reversed in an attempt to avoid copyright infringement lawsuits. (It didn’t work; Apple unsuccessfully sued Microsoft for infringement in 1988.)
As an example of these same-but-different design decisions, Apple put drive icons on the right by default, while Microsoft put them on the left in Windows. And the Mac’s mouse cursor was black with a white outline, while the Windows cursor was pixel-for-pixel identical, but different in that it was white with a black outline.

ImagIcon – Convert multiple image formats (JPG, BMP, PNG) into Windows icons

Here’s a nifty little utility that you can use to take any picture that is in BMP, JPG, or PNG format and convert it into BMP, JPG, PNG or ICO format. Using this program, you can take your favorite picture of your girlfriend, let’s say, and convert it into a Windows Icon. Then you can replace out your My Computer icon with her face rather than a boring computer! Hmmm or maybe you don’t want to see her that much…!!
Anyway, the program is called ImagIcon and it’s not only a tiny program, but it does it’s job very well. You can take an image and save it as an icon in all of the different sizes: 16×16, 32×32, 48×48, and 64×64. The 16×16 size can be used to give your web site a logo in the IE address bar. For example, in Blogger while writing a post, you can see the orange icon in the address bar:

The program also lets your transform the images if you like. You can scale the image to make it smaller or flip it horizontally or vertically. You can even save the icon with alpha transparency! And if you don’t care to save the image as an icon, you can convert between any of the three formats: PNG, JPG, or BMP.

Simply drag a picture into the colored area after configuring your settings and the picture is automatically converted! Here I took a picture of my wife & I and dropped it onto the program window. By default, it converts the picture into an icon of 32×32 and puts it in the same folder as the original picture:

You can change the settings by click on the Options menu item. Icon Settings allows you to pick the size of your final icon. Image Transform lets you pick the transformations you want if you are converting between picture formats (JPG to PNG). Remember, you can convert to the same format and simply transform the picture also. So if you have a bunch of JPEG images and you simply want to scale them quickly, then in Save Mode choose JPEG and choose the settings for image transform. And of course Save Mode is the format that you want to convert to. Save Directory is if you want to have the pictures stored somewhere else other than the directory where the originals are located.
And lastly, you can customize ImagIcon itself by choosing different colors or by loading in your own custom image for the background!

Very nice program and very handy, especially for converting images into Windows icons!
[tags]imagicon, convert images into icons, convert images into windows icons, conver to icon[/tags]

How to create a secured and locked folder in Windows XP

UPDATE: Since some people were having issues with this method of hiding a folder in XP (folder being renamed incorrectly, visible via the command prompt, etc), I am adding to the bottom another way to permanently hide a folder using a program called Free Hide Folder. Please scroll down to read about it.
If you’ve come across this page looking for a way to create a password protected, secure, hidden or locked folder in Windows XP for free, you’ve come to the right place. Unfortunately, Windows XP does not have any user-friendly built-in tools to create secure folders on computers with multiple users. Of course, you can encrypt data on your hard disk, but this only helps if your computer is stolen.
In a previous post, I wrote about how you can hide a folder in Windows XP using a rudimentary built-in feature. This method is useful if you want to hide a folder or file and you’re pretty sure that anyone who is using the computer will have no idea how to un-hide the data. If you’re dealing with someone a little more computer savvy, there is another way to create a secure locked folder without having to buy any 3rd party software.
It basically involves using a script to morph the folder into something completely different so that it’s still visible, but nothing inside the folder is accessible. In order to view the data, you have to run another script to morph it back. Anyone who clicks on the folder will be brought to the Control Panel and simply think it is a shortcut.
Here are the steps to create the protected folder in Windows XP:
  • First create a folder that you will use to store your confidential data. For example, I have created a folder called Fonts at the root of my D drive. Since the hidden folder will bring you to the Control Panel, it’s best to name the folder as one of the programs inside there.
createsecurefolder1
  • In the same location where you created the new folder, create a new file in Notepad, copy the following below into it, replace Fonts with the name of your folder and save it as loc.bat.
ren Fonts Fonts.{21EC2020-3AEA-1069-A2DD-08002B30309D}
  • To save the file as a .bat file in Notepad, just put the whole thing in quotes, like “loc.bat” and then click Save.
hiddenfolder
  • Now you should have a bat file named loc in the same directory as your Fonts folder, not inside the Fonts folder.
lockedfolders1
  • Create another NotePad file and type in the following listed below and save it as “key.bat”.
ren Fonts.{21EC2020-3AEA-1069-A2DD-08002B30309D} Fonts
  • Now you’ll have loc.bat and key.bat along with your folder. Go ahead and double-click on loc.bat and your folder will turn into the Control Panel and nothing inside can be viewed. Clicking on it will simply bring you to the Control Panel. You’ll notice the icon should have changed also.
protectedfolders
  • To view the data inside your folder again, click on key.bat and your folder will return to normal! Pretty simple!
Of course, keeping the key.bat file in the same folder will defeat the purpose of securing the folder, so it’s best to move the key.bat file somewhere else, or even better, put it on a USB stick or CD that only you can access.
Most people will be probably look at the folder and simply ignore it since it has the control panel icon and it links directly there. Of course, if someone knows this trick also, they can create their own key.bat file, etc and open it back up. However, if you’re dealing with someone who can do all of that, it’s best you check out more advanced 3rd party software to lock down a folder.
ALTERNATIVE METHOD:
If you’re having trouble with the above-mentioned method (from what I can see from the comments, a good number of people), then here’s another quick and free way to create a secure folder in Windows XP. There is a very nice program called Free Hide Folder from Cleanersoft that allows you to easily hide your private folders.
Your folders are completely hidden and you must supply a password to open the program to unhide the folders. The personal edition is free, just click the Skip Registration button unless you’re using it for commercial purposes.
free hide folder
I’ve tried this program myself and I cannot access the hidden folder via Windows Explorer nor the command prompt. So if the above method is not working, give this a shot!
Any questions, post a comment! Enjoy!
[tags]how to lock folders xp, password protect folders, how to secure folders, folder security, hide folders, windows xp, protect folders[/tags]

How to track the original location of an email via its IP address

Here’s a quick how-to guide on how you can track email to it’s originating location by figuring out the email’s IP address and looking it up. I have found this to be quite useful on many occasions for verification purposes since I receive lots of emails daily due to my blog. Tracking the IP address of an email sender does require looking at some technical details, so be ready to dig your heels in!
There are basically two steps involved in the process of tracking an email: find the IP address in the email header section and then look up the location of the IP address.

Finding the IP address of an email sender in GMail, Yahoo Mail, and Outlook

Let’s go ahead and take a look at how you would do this for Google, Yahoo and Outlook since those are the most popular email clients.
Google’s Gmail
1. Log into your account and open the email in question.
2. Click on the down arrow that’s to the right of the Reply link. Choose Show Original from the list.
track emails
Now here’s the technical part that I was telling you about earlier! You need to look for the lines of text that start with “Received: from“. It might be easier to simply press Cntrl + F and perform a search for that phase. You’ll notice that there are several Received From’s in the message header. This is because the message header contains the IP addresses of all of servers involved in routing that email to you.
message header
To find the first computer that originally sent the email, you’ll have to find the Received From that’s farthest DOWN. As you can see from the above image, the first one is from a computer called “aseem” with the IP address 72.204.154.191. Then it was routed to my ISP’s server at eastrmmtao104.cox.net and so on and so forth till it got to your email server.
The computer aseem is my personal home computer and that’s my public IP address for my house! I’ll go through Yahoo and Outlook before talking about tracking the location of that IP address.
Yahoo Mail Beta
1. Log into your account and open the email (if you’re using Yahoo Mail Beta with the new preview interface, make sure you double-click on the email so that it opens in a new tab)
2. At the top right, you’ll see there is a drop-down option where Standard Header is selected by default.
3. Click on it and choose Full Header.
yahoo header
Again, you’ll see the same information as before, just in a different window:
message headers
Microsoft Outlook
1. Open the email in Outlook by double-clicking on it
2. Go to View at the top menu (the menu options for the email, not the main Outlook window) and choose Options.
outlook message headers
You’ll get a dialog box where you can set the message options and at the bottom you’ll see the Internet Headers box. For some silly reason, the box is very small and you have to scroll a lot, so it’s best to simply copy and paste the text into Notepad to view it more easily.
internet headers

Tracking the location of an IP address

Now that we have our originating IP address of 72.204.154.191, let’s find out where that is! You can do this by perform a location lookup on the IP address. My favorites are IP2Location and GeoBytes IP Locator.
GeoBytes gave me a big map of New Orleans, LA along with a bunch of other information about the location itself.
find ip address location
IP2Location also gave me the same information pretty much, including the ISP (Cox Communications). Of course, this is correct since I live in New Orleans!
If you want more information, you can do a WHOIS database search also. My favorite one is the ARIN WHOIS Database Search. This will give you information on who hosts that IP address and their registration information. You can always contact them to try and find more information on that particular IP address.
Have fun tracking down those emails! Questions, comments, or suggestions? Post a comment!
[tags]track email, track an email, track email ip, find email ip address, locate email, find location, locate ip address[/tags]